Memorable Ornament idea!!!
Put elmers glue on baby foot push it on ornament then use glitter. This can even be done with hands, and not just for babies.

______________________________________________________________________________
COFFEE FILTER SNOWFLAKES!

______________________________________________________________________________
With Thanksgiving just around the corner, these place cards are a fun and simple way for kids to help with the Thanksgiving Day celebration!

Materials
Recycled corks
Craft foam: orange, red white paper,
Wiggle eyes, two for each turkey
Toothpick
1. Print and cut out patterns. Adhere beak, wattle, and eyes on top of cork.
2. For feathers, cut three chenille stems in half. Coil each chenille stem around pencil. Use toothpick to poke six holes in back of cork. Push ends of chenille stems in holes.
3. For tag, measure and cut 1-1/2”x2” white paper rectangle. Use black marker to write name and draw outline on tag. Tape tag on end of toothpick. Insert toothpick in cork.
Courtesy of Craftsnthings.com
Unique Birthday Party Favor: Rubberband Lollipops
This is such a unique birthday party favor for young girls! What little girl doesn't love to have a lot of ponytail holders? Moms love them, too, because they're practical birthday party favors. No little plastic pieces that you'll throw away in this loot bag! Yay. Take a look :)
Items You'll Need:
Hair bands (in color of your choice)
Lollipop sticks
Styrofoam craft balls
Clear treat bags
Ribbon
Hot glue gun
Directions:
1. Push a lollipop stick into the center of your Styrofoam craft ball, about half way through the ball. Take the stick back out and use a hot glue gun (or regular craft glue if you have the time to let it dry) and drop a little glue into the hole before replacing the stick.

2. Stretch your hair bands over the styrofoam ball in a random pattern. Continue placing the bands on until you can no longer see the ball in the middle.

3. When your "lollipop" is complete, place a small clear treat bag over the top, and secure with a ribbon (or another hair band).

You can choose to use multicolor bands or make them all one color, maybe with the color theme of the birthday party .

Additional Ideas:
Place several "lollipops" into one treat bag to make a lollipop bouquet. Use a single color for each pop. In the end use a bow of choice for a perfect design.
Put a large clay pot with a large styrofoam ball in it to arrange a lollipopbouquet for the table. Let the girls choose one (or more) as they leave the party.
______________________________________________________
Hair bands (in color of your choice)
Lollipop sticks
Styrofoam craft balls
Clear treat bags
Ribbon
Hot glue gun
Directions:
1. Push a lollipop stick into the center of your Styrofoam craft ball, about half way through the ball. Take the stick back out and use a hot glue gun (or regular craft glue if you have the time to let it dry) and drop a little glue into the hole before replacing the stick.
2. Stretch your hair bands over the styrofoam ball in a random pattern. Continue placing the bands on until you can no longer see the ball in the middle.
3. When your "lollipop" is complete, place a small clear treat bag over the top, and secure with a ribbon (or another hair band).
You can choose to use multicolor bands or make them all one color, maybe with the color theme of the birthday party .
Additional Ideas:
Place several "lollipops" into one treat bag to make a lollipop bouquet. Use a single color for each pop. In the end use a bow of choice for a perfect design.
Put a large clay pot with a large styrofoam ball in it to arrange a lollipopbouquet for the table. Let the girls choose one (or more) as they leave the party.
______________________________________________________
OMG this made me Laugh and Cry at the same time!

______________________________________________________________________________
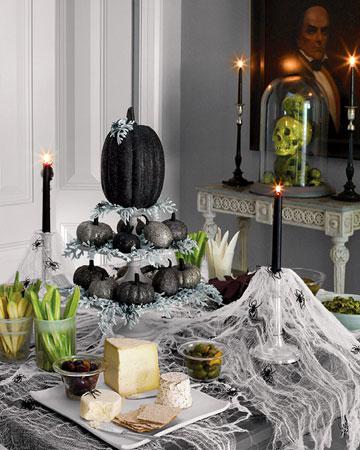
UNIQUE Pumpkin Decor ideas!!!!!!!!!!!
With Halloween right around the corner, today we bring you UNIQUE Pumpkin Decorating ideas. They're simple enough that a child can help decorate and chic enough to be displayed in your home. Take a look.


_________________________________________________________________________________
Painted Pumpkin Flower Vase!!!!

If you're looking for something fun and unique to do with your children, family or friends we have the perfect DIY idea; painted Pumpkin flower vase!!! If you'd like to give this a whirl, it's super simple and fun to do.
Supplies
Pumpkin
Paint
Paintbrush
Flowers
Directions
1. Clean the pumpkin, dry it.
2. Cut out the top, clean the inside of the pumpkin; turn the pumpkin upside down so the top is facing down.
3. Using a paint brush, paint the pumpkin with your color of choice; let the paint dry overnight.

(Ready for flowers)
4. Use a small glass vase or jar (I used an empty Prego tomato sauce jar).
5. Arrange your favorite flowers, use as much as possible to get the FULL bloom effect.
6. Place the flower vase inside the pumpkin and carefully arrange the flowers around the top of the pumpkin and viola, how pretty does that look?!


________________________________________
HAPPY WEDNESDAY!!!!!
Here's a great idea that would help with the chores/housework. You can designate with days of the week and even assign some of the tasks to the children.

__________________________________________________________________________________
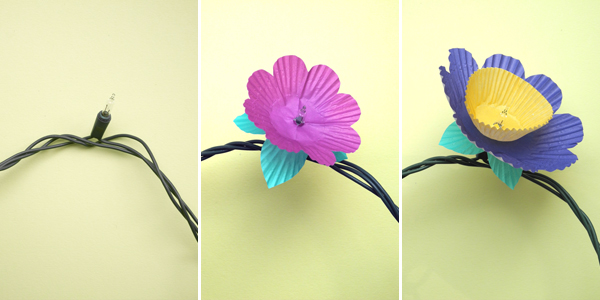
CUPCAKE FLOWER LIGHTS

If you or your children love flowers, this is for you!!! These lights were inspired by all the beautiful flowers. You can use the lights indoors in your child's bedroom, family room or outside in your back yard for some colorful outdoor lighting.
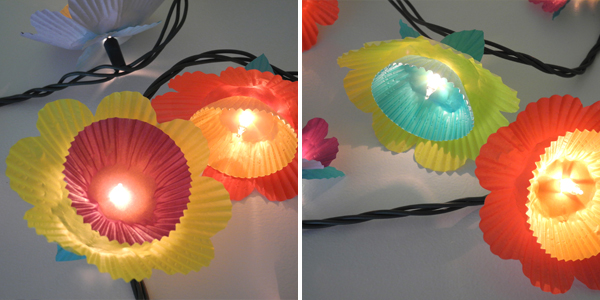
Making these floral garlands couldn’t be faster – all you need are cupcake papers and string lights, and you’re on your way to some simple summer lighting.
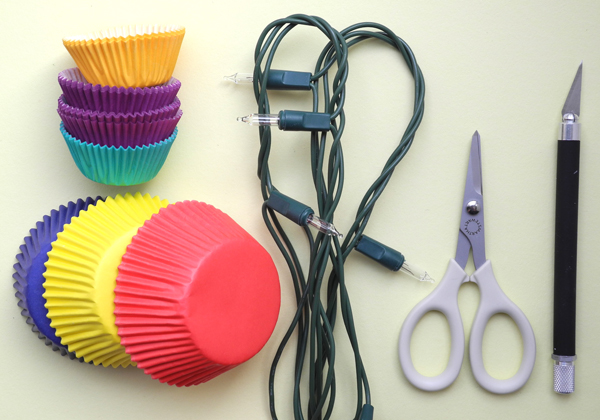
Materials you will need: cupcake papers (large and small), string lights, scissors, and an exacto knife.
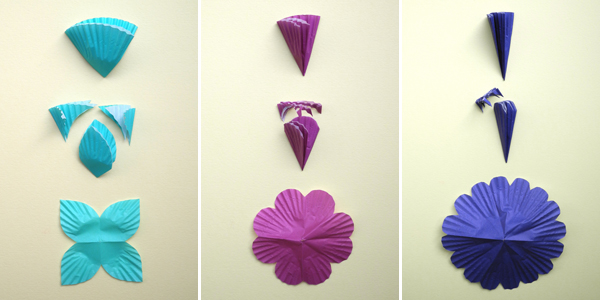
Step 1: To make leaves – fold a small cupcake paper in half 2 times, and with the folded point at the bottom cut a leaf shape.
Step 2: To make an 8-petal flower – fold a small cupcake paper in half 3 times, and with the folded point at the bottom cut around the top.
Step 3: To make a 16-petal flower – fold a large cupcake paper in half 4 times, and with the folded point at the bottom cut around the top.
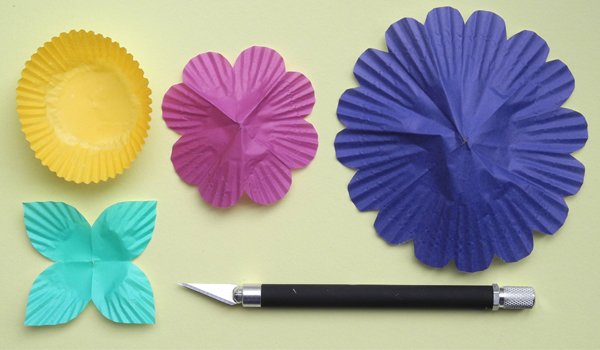
Step 4: Cut a small X in the center of each paper.
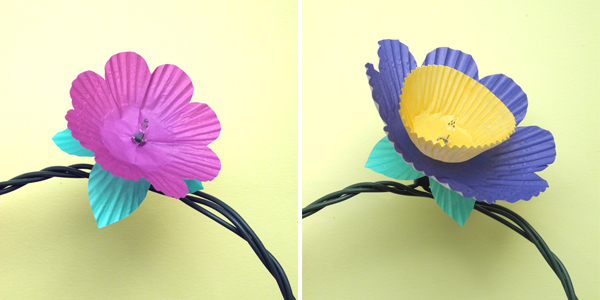
Step 5: Layer cupcake papers onto each lightbulb to make flowers.
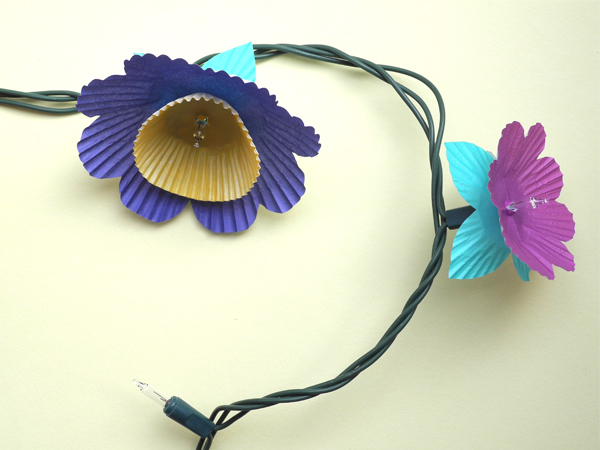
Courtesy of: ohhappyday.com
_________________________________________________________________________________
UNIQUE Activity. Say my name, Say my name!!!

Materials You Will Need: confetti, glitter, markers, sequins, paper
What To Do:
If your children are like mine, who love to work with glitter, and sequins, etc.... they will enjoy making this project very much and have a whole lot of fun.
This activity is designed to help your child understand that children want to be called by their given name only. Write your child's name in large, elaborate letters, then have your child decorate it. Tell your child the reason you chose the name and how important it is. Tell your child that everyone has a name and that's what people want to be called.
This activity is designed to help your child understand that children want to be called by their given name only. Write your child's name in large, elaborate letters, then have your child decorate it. Tell your child the reason you chose the name and how important it is. Tell your child that everyone has a name and that's what people want to be called.
Variations:
You may want to post your child's name creation on his/her bedroom door. You can also explain that some children have nicknames and that is fine, but no one should ever call children names that are not complementary.
Skills Learned:
- Social Development
- Self Concept
- Listening
- Creative Expression
Courtesy of ModernMom. For More Activities Customized to the age of YOUR child, visit www.ProductiveParenting.com.
________________________________________________________________________________
UNIQUE SILHOUETTE MIRRORS OF YOUR CHILDREN!!!

Check out her tutorial for how to make silhouette mirrors:
"I love the vintage look of a silhouette. I collaborated with my crafty friend Sonya Nimri of Sonyastyle.com on how we could make modern silhouettes of our children.
Here is what we came up with! Love them! And quite easy to make."
Supplies:
- A digital photograph of your child's silhouette
- Printer
- Craft mirrors - I used 8"
- Shelving paper
- Glue stick
- Sharp little scissors
- A can of frosted glass spray paint
- Ribbon
- Glue gun
- Rhinestone "bling tape" or scrapbooking embellishments (optional)
Directions:

Begin by getting a silhouette photograph of your child. The best way to do this is to sit them down on a chair against a blank wall.
Take photo's of your child looking slightly up, straight and slightly down. You can decide which is best when you look at them on the computer.
Once decided, play with the contrast and definition controls if your photo program allows. Try to obtain a nice crisp outline of the silhouette. If taken inside, it helps to brighten the exposure up a bit.

Crop the photo so it's just your child's head and top part of his/her torso.
Then print a black and white 4x6 print onto plain printing paper. This should give you the right size for an 8" mirror.
Glue your photo onto shelving paper with a glue stick, or even better, spray glue. Carefully cut out your child's silhouette.
You can do this two ways; one mirror as a negative and one as a positive:

If you are going for the negative effect, meaning you want the silhouette frosted, make sure your shelving paper covers the entire mirror, and carefully cut a single slit at the bottom of the shelving paper. Once placed on the mirror, you can use an extra piece of shelving paper to block this cut off, so no spray gets in.
 When you are ready to place the silhouette positive or negative on your mirror, make sure the mirror is squeaky clean and dry.
Un-stick the backing from the shelving paper and stick down firmly, rubbing out any bubbles and securing all edges with a paper towel. I don't suggest you use your fingers for this. You want to keep your mirror very clean.
In a well ventilated area (the stuff stinks!) spray the mirror with your frosted glass paint. Follow the directions on the can, as many brands vary in direction. Once dry to touch - again on the can's guidelines - carefully remove shelving paper from mirror and reveal your child's silhouette! Carefully! You don't want to nick the paint when removing.
Note: do this once the paint is dry to the touch. If you wait until it dries completely, the shelving paper could pull off extra paint when removed. If the paint has leaked in places, you can carefully scratch the leak off with a razor blade.

The octagon shaped mirror in this picture had a bevel on it, which is blocked off with extra shelving paper before sprayed. Then, once the mirror dries overnight, use "bling tape" (it is actually called this) to fancy up the edges.
Hot glue a ribbon on the back of the mirror as a hanger, and cover it with a piece of felt so it stayes nice and secure. One of the mirrors came with drilled holes in the front for hanging, so there was no need to do this to that one.

TIP: Careful when cleaning!!! If you smudged your mirror in the process, don't go spraying it with Windex once you think it is dry. The paint can recommends to wait one hour before cleaning.
Planning to try this at home? We'd love to see how it turns out! Send us photos of your crafty efforts and we'll add them to our photo gallery!
_______________________________________
EARTH DAY FUN!!!!!

Hello my lovely Unique mothers. With Earth day right around the corner, I researched and rounded up the most UNIQUE craft, cookies and snack ideas for your little ones.
I'm sure they will love spending time with their mommy and siblings to create some masterpieces while enjoying yummy and healthy snacks. Take a look and Happy Earth Day!!!!

Great Earth day snack ideas
Earth Day Fun
______________________________________________________________________
The Art of Throwing and Giving Things Away
Getting rid of things in your home can be a difficult task; it seems like we can always find reasons to hold on to items that we no longer need or use.
FUN & UNIQUE ST. PATRIC'S DAY DIY'S
Can you believe St. Patrick’s Day is right around the corner? I found this cute St. Patrick’s Day Crafts, and couldn’t wait to share it with you all, and try it with my girls.
Magic Wand

Materials: clear or white plastic drinking straws, paper scraps (construction paper, tissue paper, etc.), colored pencils or markers, scissors, glue sticks, scotch tape and glitter (optional).
Instructions:
Discuss St. Patrick’s Day, leprechauns, and magic wands with your children using the information provided below.
Choose a straw. Take scraps of paper and create shamrocks, tissue paper streamers, and/or other decorations. Cut them out.
Decorate the paper with pictures or words using the colored pencils or markers.
Tape the decorations to one end of the straw.
Add glitter with the glue if you desire.
Use your wand to create magical moments.
TEACHABLE MOMENTS
This is a great opportunity to present the following information on St. Patrick’s Day to your children. St. Patrick’s Day is celebrated on March 17th in honor of St. Patrick, the patron saint of Ireland. The shamrock and the leprechaun are symbols of Ireland. The shamrock is a plant that can bring good luck. The leprechaun is a little old man, like a fairy, who can grant three wishes to any person who captures him. Here is a St. Patrick’s Day Limerick:
There once was a shamrock named Pat.
Who tripped on a root and went splat.
She ripped her best leaf.
And sobbed in her grief,
And ruined her favorite hat.
____________________________________________________________________________
____________________________________________________________________________
Art with a Bell Pepper
What you need for this project:
-1 bell pepper
-green paint
-paint brush
-paper
-1 bell pepper
-green paint
-paint brush
-paper
 |  |
1. Cut off a thick slice of pepper.
|
2. Carefully paint the edges with green.
|
 |  |  |
3. Gently pick up pepper.
| 4. Flip and press firmly on paper. |
Ta-Da!
|
Cute Rainbow Art with Cereal, Cotton balls and glue

Love this easy and UNIQUE idea

Hand Art with Paint so cute and easy

Rainbow and Pot of Gold Bags

_________________________________________________________________
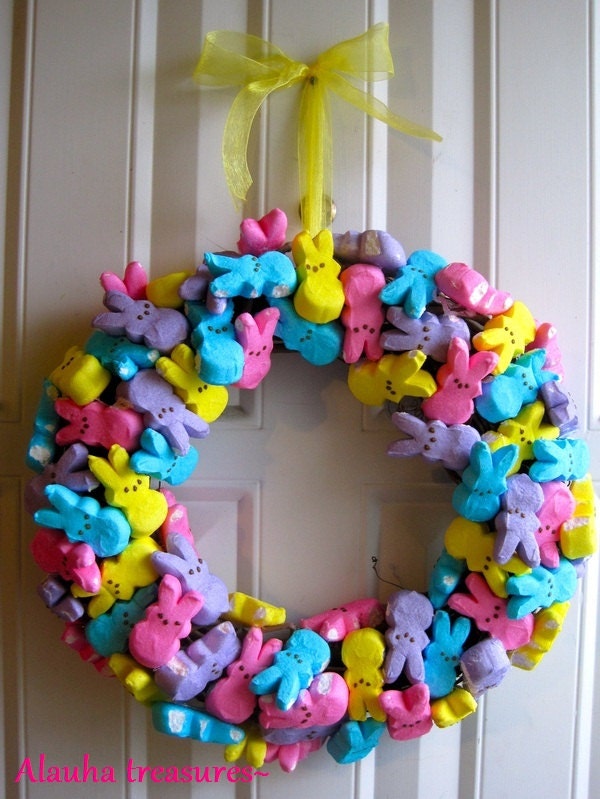
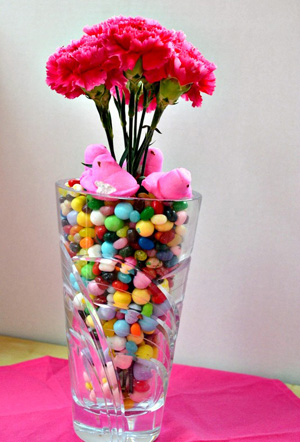
With Easter fast approaching, we bring you Easter decorating ideas. There are so many Unique, easy and cute decorations to choose from. Check it out!!!


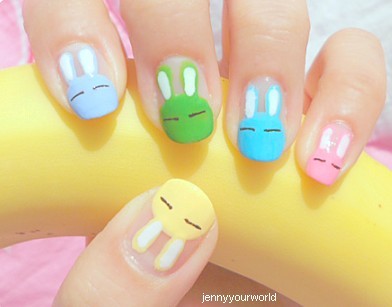


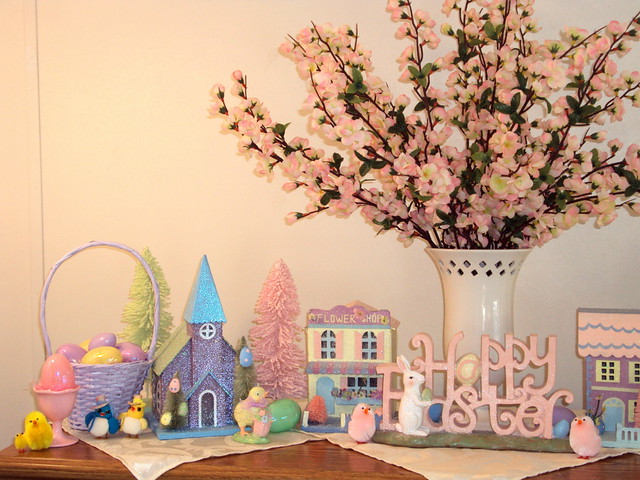
_________________________________________________________________
Terrific Terrariums
 Check out this tutorial for an absolutely adorable decorative terrarium:
Succulent terrariums seem to be all of the rage right now. I am seeing them in many different catalogues from West Elm to Martha Stewart. I saw a couple of easy succulent terrariums a week ago at a fancy store in Los Angeles and they were selling them for about $75 each!
People, don't you know they are so incredibly easy to make? Well, if you don't,. I am telling you now they're REALLY easy to make for under $10. Check it out!!!
Supplies
- A couple of wide mouthed glass vases. (Bubble vases, aka fish bowlswork well, large cylinders work well, just make sure they are wide mouthed. Succulents don't want to be trapped in humid air.)
- A few succulents. Easy to get at any garden store. Small ones in 4" pots.
- Cactus and tropical mixed potting soil.
- A bag of small pebbles.
- A bag of decorative white rocks, or white sand looks nice too.
Directions
Fill the bottom of the vases with the small pebbles, about 1 1/2'' - 2" deep:

This is to create drainage in your vase, since there isn't a hole in the bottom. Then fill 3" to 4" with potting soil.

Loosen the root ball on your succulents and plant.

Cover the top layer with decorative rocks. I chose white because I like the modern look of the finished pieces. Red rocks or black river pebbles would look great too! Enjoy your $10, I mean your $75 dollar terrarium! Happy planting!

_______________________________________________________
UNIQUE DECORATING IDEAS!!!

Beautiful way to organize children's books

Great idea with the little boxes on the bottom
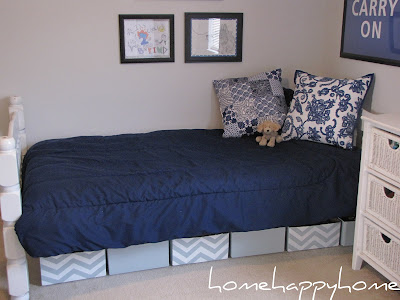
Under the bed storage

Detailed Closet Organization - (my favorite idea)

Another great idea with the days of the week

Organized Makeup Brushes

Can be used in your restroom or on your bedroom dresser

How beautiful would this look in your kitchen

Beautifully Organized
What I always want to do but never get the chance :)

_____________________________________________________________________________
What a great Idea!!!

___________________________
STAY ORGANIZED
REDUCE STRESS FOR 2013!!!
Between housework, cooking, cleaning, work appointments, doctor visits, teacher conferences, sports practice and family time, it’s no wonder moms feel overwhelmed. Below are tips to help you curb that frantic feeling and organize your busy week and year.

UTILIZE TECHNOLOGY
Moms with a PDA (personal digital assistant) should take advantage of the various free applications available today. Intuition: Mom's Personal Assistant by IconApps, Inc is a perfect start.ORGANIZE ONLINE
"To make sure your e-bills and e-statements don't get lost or overlooked among your personal e-mails, simply set up a separate e-mail account to receive them. It's a quick and easy way to be eco-friendly and keep financial matters separate from your personal life," suggests Robert Laura, personal finance expert and owner of efinanicalorganizer.com. I personally can't live without online banking love, love, love it.GO CLASSIC
While technology is convenient, nothing beats the traditional pen and paper. Keep sticky posts in your car, purse and even on your bedside table for reminders and jotting down important information.GET THE FAMILY INVOLVED
Assigning chores and raising expectations can get the entire family into a good routine. Gail Gray, owner of Fresh Start Professional Organizing and mother of two boys, reminds moms: "A CEO delegates work and so should you."HAVE A FAMILY ORGANIZER
"Keep a household notebook with all the important information in it. Things like phone numbers, instructions and scheduling in one location is vital to keep the house under control," recommends Gray.PREPARE FOR THE NEXT DAY
A lot of busy mommies make their coffee the night before, do the prep work for breakfast and have a weekly check-in with their husband to make sure they're on the same page for the week ahead. Zele Avradopoulos, owner at ZOrganize, encourages moms to involve the children in clean up before dinner or bed time to start the following day fresh.MAKE USE OF WAITING TIME
Find yourself on the train or car pool line? Deborah Kinney, CPO Certified Professional Organizer says to put that time to use, "Organize a special tote for yourself that holds your 'while waiting to dos'." Tasks can include returning phone calls, paying bills and scheduling appointments.CREATIVE COOKING
Moms can save time in the kitchen, too, Kinney points out, "Cook a one-pot meal (chili, hearty soup) and roast something. Our mothers in the '50s knew the value of roast once, serve twice. This will give you at least two dinners ready for the work week. Making a double batch and freezing half gets you even further." I personally have to do this more often.ORGANIZE THE CAR
As much time as moms spend in the car, it's silly not to have a car system. Put the glove compartment to use by keeping a pencil bag filled with pens, band aids, lip gloss and even a few dollars in cash. And don't forget to systematize the kids. Shelly Walker, a busy mother shares her secret, "I keep a lidded container in the back of the car that's only for my child's stuff." I completely agree with car organization and also suggest moms keep a small "just in case" bag in the car. Articles can include a change of clothes, sunscreen, snacks and even pajamas in case a spontaneous invitation pops up; like your children wanting to spend the night at grandmas when you just go for a quick visit :)
_____________________________________________________________
Fun Ideas to ring in the New Year!!!!!
New Year’s Resolutions
A new year is a fresh start. As crazy as the past year may have been, there’s a way to learn from your experiences and look ahead to new challenges and opportunities. Why not take some time to reflect on what has passed and make plans for the year to come? Your guests will also likely delight in looking to the future. Giving them an opportunity to create and share New Year’s resolutions is a great way to start. One idea is to offer guests strips of paper for writing resolutions. A stylish container is the perfect place to deposit them, and they can be read as a group before the party ends!

Candy Poppers
Already spending a fortune on your extravagant New Year’s Eve party but forgot about the party favors? No worries, throw some Candy Poppers together … they are easy to make, sustainable, and you can fill them with whatever your little pink :) heart desires, we recommend candy of all sorts!
Tools
• Scissors
• Tape
Materials
• Used wrapping paper or tissue paper (don’t worry if it’s wrinkled)
• Used cardboard wrapping paper tubes
• Used ribbon
• Organic Candy
1. Cut the tubes
Cut the cardboard tube into 4-inch tubes. (Alternatively you can use spent paper towel or toilet paper tubes.)
Cut the cardboard tube into 4-inch tubes. (Alternatively you can use spent paper towel or toilet paper tubes.)
2. Fill (with goodies!) and wrap
Fill the tube with small candies and wrap with a piece of used gift paper that extends three inches beyond each end of the tube.
Fill the tube with small candies and wrap with a piece of used gift paper that extends three inches beyond each end of the tube.
3. Tie off the ends
Gather and seal shut the ends of the paper and tie with ribbon and voila!
Gather and seal shut the ends of the paper and tie with ribbon and voila!

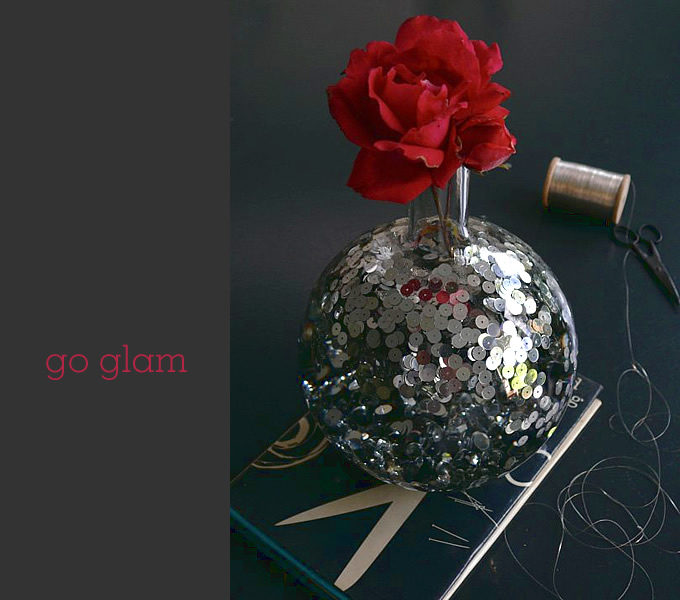
DISCO VASE
Here is a quick and simple idea to glamourise an ordinary clear glass vase.
My daughter and I had picked some flowers from the garden and I was looking for a vase to display them in. I had this old circular glass vase in the cupboard and thought it would be perfect for this idea I had.
I simply tipped a bag of silver plastic sequins into the empty vase using a funnel and then topped the vase up with water. Some sequins floated and some sank and then I just popped in a bright red rose and voila, instant glam! If you want a more delicate look simply choose an appropriate bloom.
___________________________________________________
Christmas is coming, and if you're hosting we bring you some of the most UNIUQE Holiday Decor. They're all so chic and beautiful, can you choose one?
Purple Wonderland!!!


GLAM IT UP GOLD!!!!


White Winter Wonderland!!!!


____________________________________________________
Unique Ornament Idea!!!!

for years ago. Absolutely love this idea!
____________________________________________________
Today we bring you some UNIQUE ideas for decorating your Home for the holidays.
We have put together some Unique, modern, chic, trendy and fun ideas. Take a look.

I created this for my daughter, and on the poll to the right wrote her name and called it "----- World"
It was very cute and was a great conversation piece with our guests :)
Love how classy and exquisite this decor looks
What a great idea to decorate your house with presents. Love this.
Simple and cute.

Elegance at it's best. Gives you an idea of how to bring colors together for an overall WOW!!!
Chic
Love this upside down Christmas Tree. It's probably the most UNIQUE decoration you can ever do in your house. Love it.

White Elegance
Mirrors add another level of class in any decor.

Simple yet very original

This decor shows that ornaments are not just for the trees. They are great to decorate the table with; In vases, on the table and on plates.
__________________________________________________

No comments:
Post a Comment